Top 9-Free Teal Pumpkin Chocolate Layer Cake
As temperatures are cool, those beautiful bright teal pumpkins our food allergy community knows and loves are back in season.
Not sure why I said “teal” pumpkins? I’m happy to tell you that they are the centerpiece of the Teal Pumpkin Project. It’s an awareness campaign that promotes inclusion for trick-or-treaters with food allergies. By setting out a teal pumpkin on Halloween night, you are letting trick-or-treaters know that you are offering non-food treats – that everyone can enjoy. So, whether you paint a pumpkin teal, purchase one at the store, or create one out of cake, there’s no denying it: teal pumpkins are making a bold awareness statement across America.
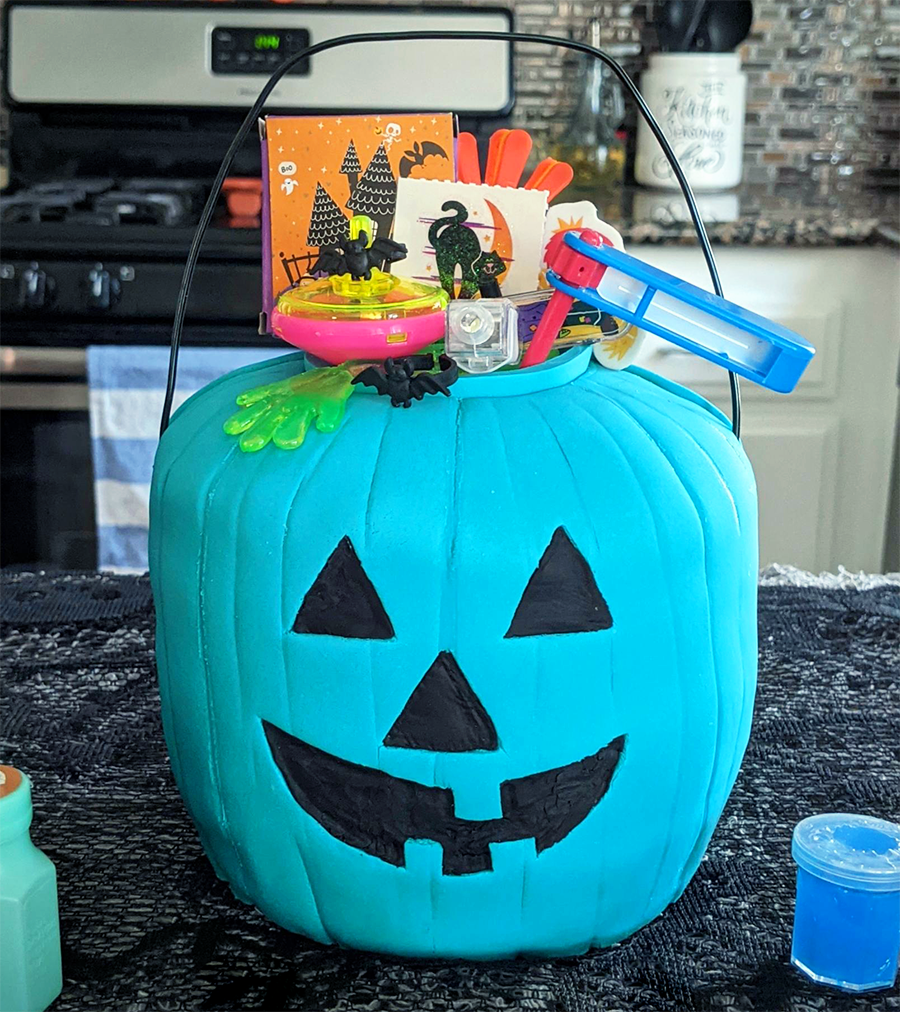
For my new “Kitchen Craft” series for Allergic Living, I was inspired to create a Teal Pumpkin Bucket Chocolate Cake that resembles the teal plastic pails many of our children carry as they go trick-or-treating. Best of all – it can be made free from the Top 9 allergens and has been topped with a fun array of food-free treats.
 Ashley with her Teal Pumpkin Cake.
 Creating a pumpkin bucket cake is not as hard as you might think. And the results will have your friends and family speechless. Below, I have broken down the process into 5 main steps. Please note the tools you will need to make the cake, and the important chilling time. The layers of the cake can be frozen on one day, allowing you to decorate the next day.
If you have a preferred cake flavor or don’t need it to be free of the Top 9 allergens, feel free to use your own cake recipe to create 4 6-inch cakes (the layers of the final cake), and skip ahead to the Carving The Jack-O-Lantern section of the instructions.
Stay tuned for more of my Kitchen Craft series, designed to help inspire Allergic Living followers with allergy-friendly baking. We may have to manage food allergies, but with a pinch of patience, a cup of creativity and a liter of love, we’ll create beautifully crafted desserts that everyone can enjoy. Inclusion never tasted so sweet.
Teal Pumpkin Bucket Chocolate Cake
Makes: 1 small 4-layer cake
Free of: Top 9 allergens and gluten-free
Ingredients for Teal Pumpkin Chocolate Cake
Cake Ingredients
- 3 cups all-purpose gluten-free flour OR all-purpose wheat flour (see Recipe Tip)
- 2 cups sugar
- ½ cup unsweetened cocoa
- 2 tsp baking soda
- 1 tsp salt
- 2 tsp pure vanilla extract
- 2 tsp white vinegar
- 2/3 cup vegetable oil
- 2 cups water
Frosting Ingredients
- 1/2 cup dairy-free, soy-free margarine (e.g. Earth Balance)
- 2 tsp pure vanilla extract
- 1/8 tsp salt
- 3 cups confectioners’ sugar, sifted
- 1-2 tsp dairy-free milk beverage
- 5-8 drops of teal food coloring
The Tools
- 2 or 4 cake pans, 6-inch size
- 1 circular 8-inch cake board
- Cake turntable or serving plate
- Parchment paper
- Whisk or fork
- Serrated knife
- Exacto knife
- Angled frosting spatula
- Fondant roller
- Dresden fondant tool
- 1 lb white fondant (such as Satin Ice Fondant)
- Teal food coloring (such as AmeriColor Soft Gel Paste)
- Black food coloring or small amount of black fondant
- 16-20 inches of 12-gauge black decorative wire
- Wire cutters
- Vinyl gloves
- Non-food decorative items (optional)
Recipe Tips
When buying gluten-free all-purpose flour, watch for allergy-friendly brands. (Some brands have allergen warnings.) Not on a gluten-free diet? This recipe works equally well with all-purpose wheat flour.
Instructions
For Cake & Frosting
- Preparing pans: Trace an outline of the bottom of a cake pan onto parchment paper and cut it out. Line the cake pan with that parchment circle. Grease the edging of the pan and place 2 parchment paper strips along the sides of the cake pan. (Tutorial here if needed.) Repeat this step for each cake you make.
- Preheat oven to 350 degrees F. A note on baking: While it’s ideal to bake all 4 cakes of the layer cake once the batter is made, I only had 2 6-inch pans. So I cut the recipe in half to create 2 cakes. Then repeated the process for the next 2 cakes. Alternatively, you can also prepare the full recipe, but place the batter waiting to be baked in the refrigerator (covered), while the first 2 cakes bake. Bring batter out 5-10 minutes before needed, then stir.
- Making the cake: Sift dry ingredients: flour, sugar, unsweetened cocoa, baking soda, and salt into a large mixing bowl. Whisk or use a fork to mix together.
- Create 2 small wells and 1 larger well in the dry mix. Add vanilla and white vinegar into the small wells and add the oil into the large well. Pour water over the three wells and mix with a whisk or fork. The mix should be thoroughly combined, with no visible lumps.
- Pour cake batter evenly (approximately 1½ cups) into each 6-inch circular cake pan to be baked now.
- Bake 30-34 minutes, until a toothpick inserted in the center comes out clean. (If toothpick shows wet batter, bake a few more minutes.)
- Allow the cakes to cool in pans to room temperature. Gently flip out onto plastic wrap, and peel off parchment paper. Individually wrap each cake securely. Place the cakes on a flat surface in the refrigerator or freezer for at least 2-3 hours or overnight.
- Making frosting: Beat softened margarine and vanilla in a medium bowl using an electric hand mixer for 2 minutes, or until light and fluffy. Add salt and sifted confectioners’ sugar, about a cup at a time, scraping down sides as needed, until well combined. If frosting is too thick, mix in one tablespoon of milk beverage.
Carving Jack-O-Lantern
- Remove one chilled or frozen cake from the fridge or freezer. Unwrap and carefully level the top dome with a serrated knife. You may need to get down to eye level for this step. Don’t take too much off the top. (It is an easy fix to slowly trim a little more cake, but harder to fix if you take off too much.) Repeat this step until all 4 cakes have been leveled.
- Spread a tablespoon of frosting in the middle of your cake board and place on your cake turntable (or countertop). Lay the first layer of your cake onto your cake board. Spread ½ inch of frosting over the top of the first layer, using an icing spatula for even spreading. Ensure you spread frosting to the edge of the cake. Place your second cake layer on and evenly spread an equal amount of frosting on top. Repeat process until the last layer is placed on top. (You’re not frosting the top). Leaving the layered cake on the cake board, place it in refrigerator or freezer to chill for 20-30 minutes.
- Shaping: I wanted my pumpkin cake resemble the traditional trick-or-treat plastic pumpkin pail. To achieve this look, we need to round the top and bottom of the cake. First, remove the layered cake from the refrigerator or freezer, setting onto your turntable or counter. Then place a sturdy cutting board on top of the cake. Slowly move the cake board to the edge of your turntable or counter until you are able to get your hand underneath the bottom of the cake board. With the bottom of the cake board in one hand and your other hand on top of the cutting board on top of the cake, flip your cake over. The bottom of your cake is now on top.
- To start carving the bottom, note the center of the (now) top layer. Place the serrated knife approximately 2 1/2 inches out from the center. Angling the knife outward at that spot, carefully trim the cake downward, rounding it. I trimmed down about 1 inch. Create this rounded curve all the way around the cake.
- Now, flip the cake back over to right-side up, and follow the same careful carving process to round the edges of the actual top of the cake.
Note: if you are not comfortable flipping the cake, you can also carefully trim the cake’s bottom without flipping.
Teal Frosting & Fondant
- Crumb-coating the cake: using your angled spatula, apply a thin layer of teal frosting to the outside of the cake. Note: this thin layer is only to seal in crumbs. The cake will be fully frosted later.
- Place cake in the refrigerator for about 25 minutes to chill.
- Set chilled cake back onto the turntable or counter to frost. Use the teal frosting to cover the cake. Smooth the frosting with your spatula.
- Fondant: For the workspace, dust a clean surface with cornstarch or lay out a large sheet of parchment paper to prevent sticking. Wear food-safe vinyl gloves to keep hands stain-free. Now, slowly add a few dots of teal gel food coloring to the 1 pound of white fondant and knead. Continue kneading and adding teal food coloring gel (10-15 drops) until you have reached your desired color.
- Using a fondant roller, roll out your fondant on the workspace, until it is approximately 1/8 of an inch thick.
- Cover the cake with fondant by gently lifting one edge, so you can place one hand underneath the fondant. Lift the fondant enough to get your other arm underneath it and gently lower it over top of your cake.
- Carefully smooth out the fondant with your hand. Trim any excess fondant with an exacto knife. Seal and save any teal fondant that does not have any frosting on it for later.
Pumpkin’s Ribs, Face & Rim
- Use a Dresden fondant tool and ruler to carefully create the ribs or vertical lines that go around the pumpkin. Evenly space the rib markings by gently indenting the fondant with your ruler and running the Dresden tool alongside the ruler for an even line.
- The face: Create your jack-o-lantern’s face by drawing out a template on a sheet of paper. Use an exacto knife to cut out the design. Hold it up to your cake and use the exacto knife to cut the pumpkin’s face out of the fondant. Roll out a small portion of black fondant and use your template to cut out the shapes you need to fill in. Use the Dresden tool to gently put them into place.
- Make the bucket rim by lightly indenting the top center of the cake with a circular cookie cutter or by placing a circular template on top of the cake. Use an exacto knife or sharp kitchen knife to cut out the circle. Remove and discard the center fondant. Remember that teal fondant we sealed for later? Take it out, and roll it out into a long rectangular shape that is ¼-inch thick. Gently place a ruler or other straight-edge on top of the fondant and use an exacto knife to cut out a strip of fondant. (My fondant strip measured 9-inches wide by ¼-inch high.) Place the fondant along the inside of the rim. If needed, trim with an exacto knife for proper fit.
- For the handle, cut your desired length of black, 12-gauge decorative wire (about 16-20 inches). Shape it by wrapping it around a rounded container. Bend each end to create a 60 to 90-degree angle and press into both sides of your teal pumpkin. (This is decorative, don’t lift by the handle!)
Lastly, Non-Food Treats!
No teal pumpkin is complete without some non-food treats and this cake is no exception! Add new, clean items such as spin tops, sticker boxes, plastic eyeballs, noise makers, and more to the opening of your teal pumpkin bucket cake. That’s it. You have just created your very own Teal Pumpkin Bucket Chocolate Layer Cake. Enjoy!
Photos: Ashley Smith
Sign up for Allergic Living's free newsletter for more great allergy-friendly and gluten-free recipes, plus the latest food allergy research and news.