Allergy-Friendly Magical Reindeer Chocolate Cake
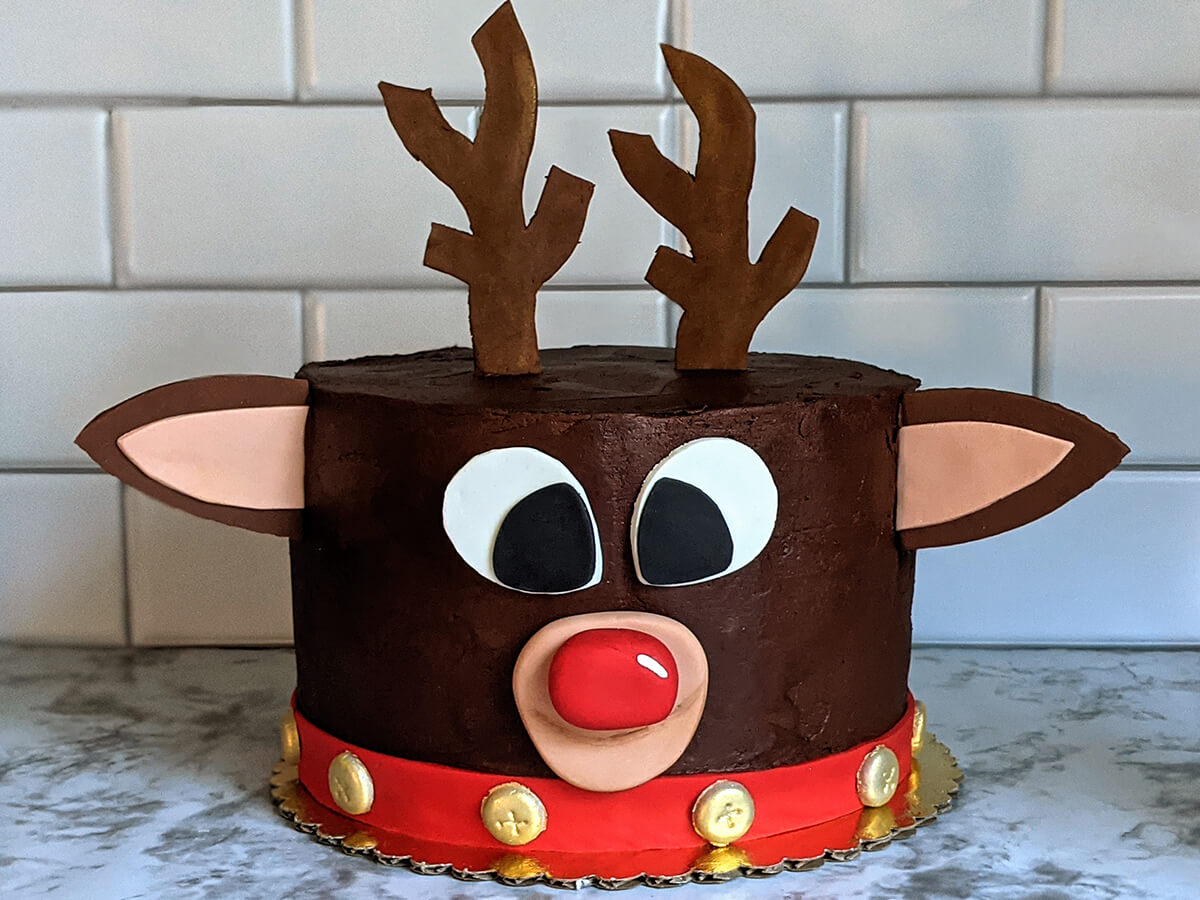
Introducing my Magical Reindeer Chocolate Cake, one of the cutest holiday cakes around. Not only is it inspired by Rudolph, the most famous reindeer of them all, it’s made with allergy-friendliness top of mind.
Even Santa would be impressed by the Magical Reindeer Chocolate Cake’s sweet inclusivity. For the holiday season, it’s the perfect dessert conversation piece. And just as Rudolph guided Santa’s sleigh, I’m proud to guide you through the cake’s steps, the latest creation in my Kitchen Craft series for Allergic Living.
This chocolate layer cake is surprisingly not as hard to make as you might think. Since the holiday season is busy enough, I took it easy by using an allergy-friendly cake mix to make the four cake layers. (Use the brand of your preference, just be sure to prepare at least two standard 15.25-ounce boxes or bags of cake mix.)
Yet, I did invest time in the few minutes it takes to make a delicious batch of homemade chocolate buttercream frosting – yum! I call it “buttercream” because of its delightful texture. But my frosting is in fact dairy-free and soy-free.
To keep the cake’s creation easy on you, I encourage making the cake layers and almost all the fondant decorations in advance.
Decorating Fun: Let’s Make Antlers!
 Ashley and her reindeer cake.
 The fondant decorating in the Reindeer Chocolate Cake is the part that is pure joy to me. I hope I will convert you to the decorating cause, as it is such creative fun. Linked here are stencils for making the decorating elements, like the reindeer’s antlers, ears, mouth and eyes. However, if you’re artistic, feel free to draw and cut out your own patterns.
Note: If you prefer to color white fondant instead of purchasing the colored fondant, remember to add color gradually. It’s far easier to add more color than it is to try to lighten up a color. You will also need to purchase extra white fondant, and I recommend using a gel color.
Happy holidays! Please continue to share your cake photos when you give them a try on Allergic Living’s Facebook or Instagram pages. Stay tuned in the new year for more of my Kitchen Craft series. Who knows what kind of beautifully crafted desserts we will be creating next.
Reindeer Chocolate Cake
Makes: 1 8-inch finished cake
Free of: all top allergens and gluten
Ingredients for Reindeer Chocolate Cake
Chocolate Cake
- 2 15.25-oz boxes (432 g) cake mix
Chocolate Frosting
- 1 1/2 cups dairy-free, soy-free margarine, room temperature
- 1 cup unsweetened cocoa powder
- 4 1/2 cups powdered sugar, sifted
- 4 tsp pure vanilla extract
Fondant for Decor
- 1 4.4 oz package white fondant (such as Satin Ice)
- 1 4.4 oz package brown fondant
- 1 4.4 oz package red fondant
- Optional: 1 4.4 oz package gold fondant
Tools
- 2 or 4 8-inch round cake pans
- 9-inch cake board
- Cake turntable
- Large mixing bowl
- Parchment paper
- Plastic wrap
- Electric hand mixer
- Angled frosting spatula
- Bench scraper
- Exacto knife
- Dresden tool
- 12-gauge wire or wooden skewers
- Wire cutters (if using wire)
- Exacto knife
- Small brush
- Optional: Gold and brown luster dust
Instructions for Reindeer Chocolate Cake
Cake Layers
- Set dairy-free, soy-free margarine (such as Earth Balance) on the counter to make chocolate frosting later. Margarine must be room temperature when ready to prepare.
- Making cake layers: Line the bottom and edges of 4 8-inch cake pans with parchment paper to prevent sticking. Prepare cake batter from your allergy-friendly mix (or cake recipe), and follow directions. Once cakes are baked, let them to cool in pans for 10-15 minutes.
If working with only 2 8-inch pans, prepare the first 2 pans as above and prepare 1 cake mix. While the first 2 cake layers are baking, prepare the second cake mix. Once first layers have cooled and pans are available, line them with parchment, then pour the next batter. Bake second round of layers, then cool. - Remove a cake layer from its pan by gently flipping the pan out onto plastic wrap. Repeat with all 4 pans. Securely wrap the cake layers and chill in the refrigerator overnight. Alternatively, place them in the freezer for a few hours, days (or even a month) before frosting.
Chocolate Frosting
- Place room temperature dairy-free, soy-free margarine, unsweetened cocoa powder, powdered sugar, and vanilla into a large mixing bowl.
- Using an electric hand mixer, mix the ingredients on low speed. If frosting is too thick, gradually use up to 1 tablespoon of dairy-free milk beverage or water to thin. If you need to thicken, add up to another ¼ cup of powdered sugar. Scrape the sides of the bowl with a spatula and continue mixing until the frosting is smooth and well-combined.
- Place frosting in the refrigerator, until slightly chilled.
Frosting Cake
- Once cakes have chilled, smear a tablespoon-sized amount of frosting onto the center of your cake board. Place onto turntable. Stack your cakes by placing your first cake layer down followed by a layer of frosting. Repeat until the fourth layer of cake is placed on top.
- Apply a thin, initial layer of frosting (called a ‘crumb coat’) using a frosting spatula. Then smooth with a baking and bench scraper, as in this video. Tip: Avoid having crumbs mixed in the outer layer of frosting by scraping any crumb-filled frosting into a separate small bowl.
- Chill layered cake for approximately 30 minutes. Cover the remaining frosting.
- Finish frosting your cake by applying a final layer of chocolate frosting with the spatula. Create a smooth finish by holding a bench scraper parallel to the side of the cake as you rotate your turntable. Place cake in refrigerator while creating the fondant decorations (or the ones you haven’t yet made).
Reindeer’s Fondant Decor
To begin, first print out my stencil here of the antlers, ears, eyes and mouth. (Or, draw your own.) Next, cut out the stencils and set aside.
- Antlers & outer ears: Roll out brown fondant to at least 1/4-inch thickness. Place antler and ear stencils on top of the fondant, then use an Exacto knife to cut out each shape. For reference, my antlers each measured about 5¼ inches in height and 2½ inches in width. The ears measured 3 inches in height and 2¼ inches in width.
Carefully insert 12-gauge wire or a wooden skewer up through the fondant shapes until at least halfway into the fondant. My wire measurements were approximately 4 1/2 inches long for each antler and 3 inches long for each ear. Set antlers and ears aside on parchment paper to dry.
Optional: Using a soft bristle decorating brush, dust brown or gold shimmer dust onto the antlers. - Inner ears & mouth: For these reindeer parts, we’re going to create light brown fondant. Mix white fondant with a small piece of leftover dark brown fondant (or use gel food coloring to color white fondant). Once you have a light brown color, roll out a piece of fondant that is approximately 3×3 inches and 1/8-1/4 inches thick. This will be for the inner part of the ear. Double wrap remaining fondant with plastic wrap and preferably in an airtight container until ready to use later.
Place the inner ear part of the stencil on the fondant and cut it out with an Exacto knife. Repeat for second ear.Apply a light brush of water to the back of an inner ear and press it into the outer ear (see photo for reference). Repeat. Set outer ears aside with the antlers to dry.
Take out the remaining light brown fondant. Place the mouth stencil on top of it and use the Exacto knife to cut its shape. Set aside.
- The nose: Shape red (or black) fondant into an oval shape. Attach a small piece of white fondant on the top edge of the nose. (See photo.) Position the nose to the top of the light brown mouthpiece and gently press to create an indent of where the nose will go. Now, pull the nose off and brush a small dap of water onto the back of it. Connect the nose to mouthpiece. Create the reindeer’s smile slightly below the nose by lightly sliding a Dresden tool across the width of the mouth. Set aside to dry.
- The eyes: Roll out a piece of white fondant to about 5 inches wide and 3 inches in height. Place eye stencil over the fondant and use Exacto knife to cut out the eye shapes. Now, cut the eye stencils down in size, to make the black pupils. Roll out a similar size of black fondant. Place the smaller eye stencils over the fondant, and use the Exacto to cut them. Use a small brush of water to the back of a black pupil and adhere to the white of the eye (as shown). Repeat. Set eyes aside to dry.
- Jingle bells: Roll out gold, silver, or white fondant. Place a layer of plastic wrap on top of the fondant. Using a small circle cutout, such as a glue stick top or similar, press the cap onto the fondant that’s covered by the plastic wrap. Repeat process to make 12 jingle bells. Dust with gold luster dust, if desired.
Notice that we are not making the collar, yet. That’s because we need to shape it around the cake, so we want the fondant to be soft and flexible.
Decorating Reindeer Chocolate Cake
- Once your layered cake is frosted and chilled and the fondant decorations have dried, bring the cake out to decorate.
- Start by brushing a small amount of water onto the back of the mouth and nose decoration. Center it onto the cake. Hold for a few seconds while it adheres.
- Use the same method to add the eyes.
- Carefully insert the wires of the ears to the top outer sides, and the antlers on top of the cake.
- Now, we make the collar. Roll out a long strip of red fondant. Use the Exacto knife to cut out a 26-inch by 1-inch strip and wrap it around the bottom of the cake. Once secure, begin brushing the back of the jingle bells with water to connect to the collar. Space each bell 2 inches apart.
That’s it for this holiday-inspired Kitchen Craft. All that’s left is to wow your family and friends with your Magical Reindeer Chocolate Cake.
Related Recipes:
Kitchen Craft: Baking Magic: Sensational Snow Globe Cake
Kitchen Craft: Apple Pie Cupcakes with Cinnamon Cream ‘Cheese’ Frosting
Pies, cookies and gingerbread: Allergic Living’s awesome list of holiday dessert recipes.
Photos: Ashley Smith
- Allergy-Friendly Holiday Recipes
- Allergy-Friendly Kitchen Craft
- Allergy-Friendly Recipes
- Baking
- Cakes, Cupcakes
- Cakes, Cupcakes
- Cakes, Cupcakes
- Celiac, Gluten-free
- Christmas, Hanukkah
- Dessert
- Eggs
- Fish
- For Kids
- Holiday Desserts
- Milk/Dairy
- Mustard
- Other Legumes
- Peanut
- Sesame
- Shellfish
- Soy
- Sulphites
- Tree Nuts
- Vegan
- Wheat
Sign up for Allergic Living's free newsletter for more great allergy-friendly and gluten-free recipes, plus the latest food allergy research and news.