Furry Monster Chocolate Cake for Allergy-Friendly Halloween

Introducing a fun addition to my Kitchen Craft Series for Allergic Living: Furry Monster Cake. Dust off those baking pans and prepare to create a cake so cute – it’s scary!
Join me, as I unveil the secrets behind turning any allergy-friendly packaged cake mix into an adorable furry monster cake. With Halloween creeping up, this showstopping little cake is perfect for parties and spooky season celebrations.
I used Better Batter’s 16-ounce chocolate cake mix, which is tasty and free of the Top 9 allergens and gluten-free. But you can use any mix that you prefer. You’ll also need allergy-friendly fondant and gel food coloring. (I’ll suggest brands.)
Learn how to use various frosting colors between each layer of cake to create a visually striking design when cut into. We’ll use simple piping techniques to cover the cake in a delicious dairy-free buttercream frosting.
Decorating Furry Monster Cake
Then I’ll guide you through creating fondant decorations that will bring this adorable monster to life. I recommend giving a quick read through the instructions before starting, so you get a sense of the frosting and decorating steps.
Note that while decorating this cake is surprisingly easy, be prepared that piping the monster’s fur can be a tedious task. Feel free to take a break here or there to give your hand a rest.
 Frosting first 2 layers.
 Also, don’t be shy to let your creativity shine – have fun! Use different frosting colors, give your monster a facial expression to match its personality, or add an extra eye or two. Something I love about this cake is that there is no wrong way to design your monster.
Let’s begin. Follow my step-by-step instructions so you too can create a Furry Monster Chocolate Cake that is nothing short of spooktacular. Don’t forget to share photos of your creative monster cakes on Facebook and Instagram and tag Allergic Living. I can’t wait to see what kind of monster cake you will create!
Furry Monster Chocolate Cake
Makes: 1 6-inch, 3-layer cake
Free of: Top 9 allergens and gluten
Ingredients for Furry Monster Cake
Chocolate Cake
- 2 standard-size packages chocolate cake mix
Vegan ‘Buttercream’ Frosting
- 1 cup dairy-free, soy-free margarine (such as Violife or Earth Balance)
- 4 tsp pure vanilla extract
- 1/4 tsp salt
- 6 cups confectioners’ sugar, sifted
- 1-2 tsp dairy-free milk beverage
- Small bottles of gel food coloring, any colors (such as Americolor Soft Gel Paste)
Fondant for Decor
- 1 4.4 oz package white fondant (such as Satin Ice)
- 1 4.4 oz package black fondant (such as Satin Ice)
Tools
- 2 or 3 cake pans, 6-inch size
- 8-inch circular cake board
- Large mixing bowl
- 3 medium-sized bowls
- Electric hand mixer
- Parchment paper
- Whisk
- 4 large piping bags
- Large round piping tip
- Angled frosting spatula
- Fondant roller
- Open star piping tip
- Serrated knife
- Exacto knife
- 2 lollipop sticks or blunt skewers
- Vinyl gloves (optional)
- Cake turntable (optional)
Instructions for Furry Monster Cake
Cake Layers
- Set dairy-free margarine out until it reaches room temperature. Line the cake pans with parchment paper.
- Preheat oven. Mix up batter and bake the cakes according to package instructions. Once cakes have finished baking, let them to cool in the pans for about 15 minutes.
.
Note: If working with two 6-inch pans, prepare the second cake mix while first two cake layers cool. Once baked layers are cool, remove them from pans and re-line the pans with parchment paper. Pour remaining batter into the two pans. Bake and cool. We’ll only use 3 layers for finished cake, so put one baked layer aside for another treat. (Alternatively, pour one pan and use rest of second batter to make my Monster Cupcakes). Bake and cool. - Wrap the cooled cakes securely in plastic wrap and place them in the freezer on a flat surface overnight or for 3-4 hours, if in a hurry.
Frosting Cake Layers
- Prepare the frosting in a large bowl. Using an electric hand mixer, mix margarine and vanilla using an electric mixer. Add salt. Combine 1 cup of confectioners’ sugar into the mixture at a time. If frosting is too thick, add a teaspoon of dairy-free milk beverage.
- Divide half the frosting among 3 medium bowls. (Reserve the remaining half of frosting in large bowl in the fridge. It’s for the monster fur.) Now, color the frosting in the 3 medium bowls by adding 3-5 drops of one gel coloring (orange, purple, green) into each bowl.
- Remove cakes from freezer and level the tops with a serrated knife for an even surface. Smear a small amount of any color buttercream in the center of the cake board. Place the first cake on the board.
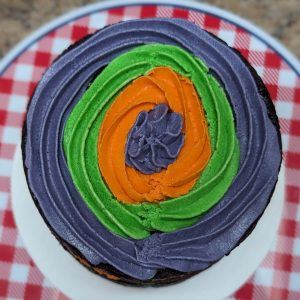
- Working from the outer edge towards the center, pipe a circle using green frosting followed by orange and then purple. (See inset photo.) Add the next cake layer and repeat the frosting pattern, beginning with orange, then purple, and then green. Stack the top layer, bottom side up. (The top is not frosted; it will get ‘fur’.)
- Next, create a crumb coat with remaining colored frosting in the 3 bowls. Using an angled frosting spatula, apply a thin layer of all over the top and sides of stacked cakes. (This seals in crumbs.) Chill the cake in the refrigerator to set the crumb coat.
Decorating Your Furry Monster
- Prepare the second half of the frosting, using 4-6 drops of green color for the “monster fur”. Refrigerate until 5-10 minutes before you begin to pipe it.
- For the eyes, roll a small piece of white and of black fondant to 1/4- to 1/8-inch thickness, lay a piece of plastic wrap over both pieces. Cut out eyes and irises, attach with water, then attach to the cake. (See photo.)
- For the mouth, using the fondant roller, roll out black fondant. Now, cut out the monster’s mouth with an Exacto knife. Color a small piece of white fondant pink (or light purple) for the tongue by dipping a toothpick in the color bottle and dabbing a small amount on the fondant. Use your hands to knead color into the fondant. Repeat process if you need more color. Roll out fondant to 1/4-inch thickness and cut the tongue shape. Stick tongue onto mouth with water and cut excess fondant. Now attach mouth to the cake.
.
Tip: Wear disposable gloves to prevent staining. Kneading the fondant will make it more pliable. - For horns, color two 2×2-inch fondant pieces. Twist and shape them into horns. Insert a lollipop stick halfway into the bottom of a horn, with at least 2 inches of stick still extending from the bottom.
- To create the monster’s fur, pipe green frosting using an open star piping tip. Start at the base of the cake, piping around it. Continue to pipe stars around the cake, moving up a line, layer after layer, until the entire cake is covered in “fur”. Take breaks as needed, and see top photo for reference.
- Add any remaining fondant eyes or decorations you choose to create. And watch your cake come to life. This Furry Monster Cake is ready to delight all of your guests! Slice and serve.
Looking for an alternative monster-themed dessert to serve at your celebration? Check out how to make and decorate Furry Monster Cupcakes!
Related: Ashley’s Teal Pumpkin Chocolate Layer Cake
Photo: Ashley Smith and Getty Images
Sign up for Allergic Living's free newsletter for more great allergy-friendly and gluten-free recipes, plus the latest food allergy research and news.