Top 9-Free Red, White and Blue Cake Cups
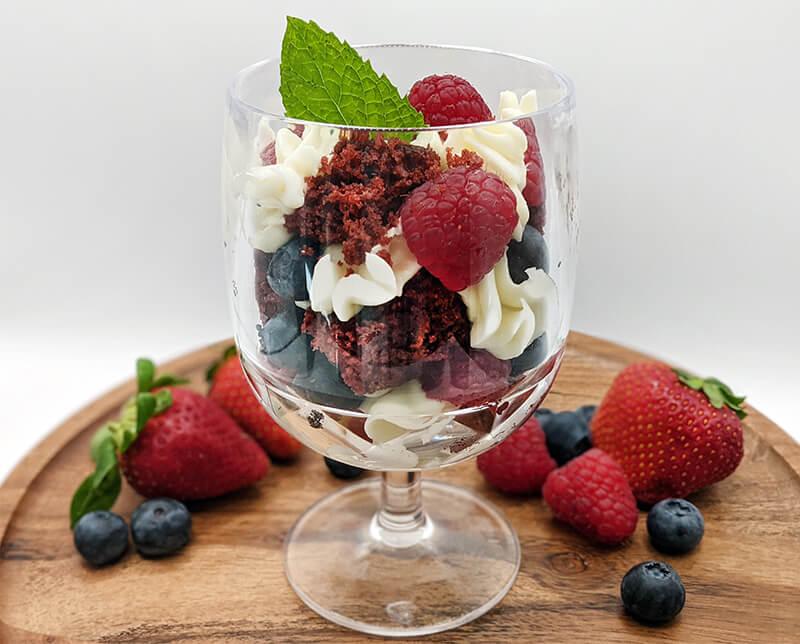
If you’re looking for a summer dessert that will have your guests oohing and aahing, look no further. Enjoy patio celebrations, pool parties, Memorial Day, the coming Fourth of July and more – with my allergy-friendly Red, White and Blue Cake Cups.
Filled with a delicious moist red velvet cake, dairy-free cream cheese frosting and fresh berries, this dessert from my Kitchen Craft series is perfect for any summertime gathering.
Family and friends will love getting their own individually prepared cake cup, and appreciate the patriotic flare. Meanwhile, you’ll love just how easy these stunning desserts are to make and serve.
Unlike some of my other baking projects for Allergic Living’s Kitchen Craft series, this project requires no precise leveling or stacking of cake layers. The red velvet cake recipe is free to Top 9 allergens. In it, we’ll use gluten-free oat flour and a dairy-free milk beverage.
For our topping, I’ve created a simple dairy-free, soy-free cream cheese frosting recipe. To create a vegan frosting that will hold its shape, you will want to use a dairy-free, soy-free margarine that has a fat percentage of 78-79%. I used Violife plant butter (79%) but you can also use Earth Balance sticks (78%). Using anything under this percentage will create a frosting that is too thin to pipe.
When catering to a larger group, assembling your dessert into glasses or jars may not be practical. In this case, use dessert cups with lids. Smaller in size than the 12 fluid-ounce glasses I used, these will also give you a greater number of cake cups. Dessert cups with lids are easily found online or in stores. They are also a convenient and practical way to transport your desserts without any mess. Just don’t forget to bring the spoons!
For Canadians: While American followers will proudly serve up the red, white and blue cake cups, you can easily forgo the blueberries. Instead, just use raspberries and strawberries, in tribute to Canada’s red and white flag.
Variation: Prefer to serve cupcakes? You can also use these same ingredients to make 8 red velvet cupcakes with a white (dairy-free) cream cheese frosting, decorated with red and white berries. I include instructions for these as well.
Red, White and Blue Cake Cups
Makes: 7-8 1 cup dessert cups
Free of: top allergens and gluten
Ingredients
Cake and Fruit
- ½ cup dairy-free milk beverage
- ½ tbsp white vinegar
- 1 cup gluten-free oat flour, sifted (see Recipe Tips)
- ½ cup sugar
- ½ tbsp unsweetened cocoa powder
- ½ tsp baking soda
- ¼ tsp salt
- 3 tbsp oil (canola, vegetable or corn)
- ½ tbsp pure vanilla extract
- 20-30 drops red gel food color (e.g. Americolor)
- 12 oz blueberries
- 12 oz raspberries
- Optional: strawberries
- Optional: mint leaves
‘Cream Cheese’ Frosting
- 7.05 oz dairy-free cream cheese (e.g. Violife Original or see Recipe Tips)
- ½ cup unsalted dairy-free, soy-free margarine (e.g. Violife or Earth Balance Sticks)
- 1/8 tsp salt
- 1 tsp pure vanilla extract
- 4 cups powdered sugar
Tools
- 13×7.5-inch brownie pan or 9×9-inch pan
- Sifter
- Small bowl or measuring cup
- Medium mixing bowl
- Electronic hand or stand mixer
- Parchment paper
- Cake cutting knife
- Pastry bag
- Toothpick
- Open or closed star decorating tip
- Optional: 1-inch star cutter
Recipe Tips
Sift your gluten-free oat flour first, then measure out the cup needed for the recipe. If you measure before sifting, you may get too much flour, and that can affect results. Less flour may be needed if using a non-oat GF flour or wheat flour.
Make It Dairy Free
has a list of other dairy-free cream cheeses; just watch for allergens.
Instructions for Red, White and Blue Cake Cups
- Preheat oven to 350 degrees. Line the edges and bottom of cake pan with parchment paper.
- Create a dairy-free buttermilk by pouring a dairy-free milk beverage into a small bowl or measuring cup. Add white vinegar. Give a few gentle stirs. Let the mixture sit for at least 5 minutes.
- In a medium mixing bowl, use a whisk to combine the sifted flour, sugar, cocoa powder, baking soda, and salt. (FYI, I used Betty Crocker Gold Medal Gluten Free Flour.)
- Now add into the buttermilk mixture the oil, vanilla extract, and red gel food coloring. Stir together.
- Pour wet ingredients into the dry ingredients bowl. Mix wet and dry ingredients until thoroughly combined.
- Evenly pour batter into lined cake pan. Bake for 26-30 minutes if using a 13-inch brownie pan or 25-27 minutes if using a 9×9-inch pan. Cake is ready when a toothpick comes out clean when inserted into the center. Allow cake to cool completely before assembling cups.
Variation: To make cupcakes: fill cupcake liners to ¾ up with batter. Bake for 18-20 minutes. - Making frosting: Using your hand or stand mixer, beat slightly softened margarine on medium speed for about 2-3 minutes or until it is smooth and lump free.
- Add dairy-free cream cheese and beat on low speed for approximately 30 seconds. Don’t overbeat the mixture.
- Add vanilla extract and one cup of powdered sugar. Mix on low speed and continue to add the remaining powdered sugar (one cup at a time) until you have a thick frosting that will hold its shape for piping. Place in the refrigerator for at least 10-15 minutes to chill.
Assembling Dessert Cups
- Wash and dry red and blue berries of choice. I chose raspberries, strawberries, and blueberries.
- Cut your completely cooled cake into 1×1-inch cubes. Depending on the desired size of the dessert cups, this measurement may vary. Optional: Looking for an extra patriotic flare? Use small star cutter to cut out your cake.
- Take frosting out of the refrigerator. Whip and scoop frosting into a pastry bag, and use your preferred decorating tip. I used a closed star tip, but any star tip will work.
- Fill the dessert cup by alternating red velvet cake and fresh berries. Accent your dessert by piping small stars of cream cheese frosting throughout the middle and top of your dessert. Note: unless you want a very sweet treat, less is more in terms of using frosting in this recipe.
- Optional: Garnish the top with left over red velvet crumbs, a mint leaf, or both. For best results, serve immediately. I recommend making frosting the same day as your celebration, and assembling cups within hours of serving. If absolutely necessary, refrigerate an hour or two prior to serving. And now, indulge!
Photo: Ashley Smith
Sign up for Allergic Living's free newsletter for more great allergy-friendly and gluten-free recipes, plus the latest food allergy research and news.