Baking Magic: Sensational Snow Globe Cake
Often collected and put on display during the winter season, snow globes are a timeless home décor item enjoyed by children and adults of all ages. With one light shake, you’ll find yourself mesmerized as the snow swirls around a miniaturized scene.
For this winter-inspired Kitchen Craft series project, I couldn’t resist the opportunity to create a truly magical winter wonderland cake. As a baking enthusiast and fellow snow globe collector, I will walk you through the steps to creating your own small Snow Globe Cake – free from the top 9 allergens.
What I love most about this project is that there is so much flexibility. For instance, maybe you have a preferred cake flavor, or perhaps you don’t need your cake to be free of all top allergens. In such a case, feel free to use your own cake recipe, then follow my directions to finish and decorate.
 Ashley Smith
 Want to create a snow globe that represents a specific holiday you celebrate? You can! Add a Christmas tree or dreidel or a minature New Year’s banner. How you decorate the scene inside the globe is completely up to you.
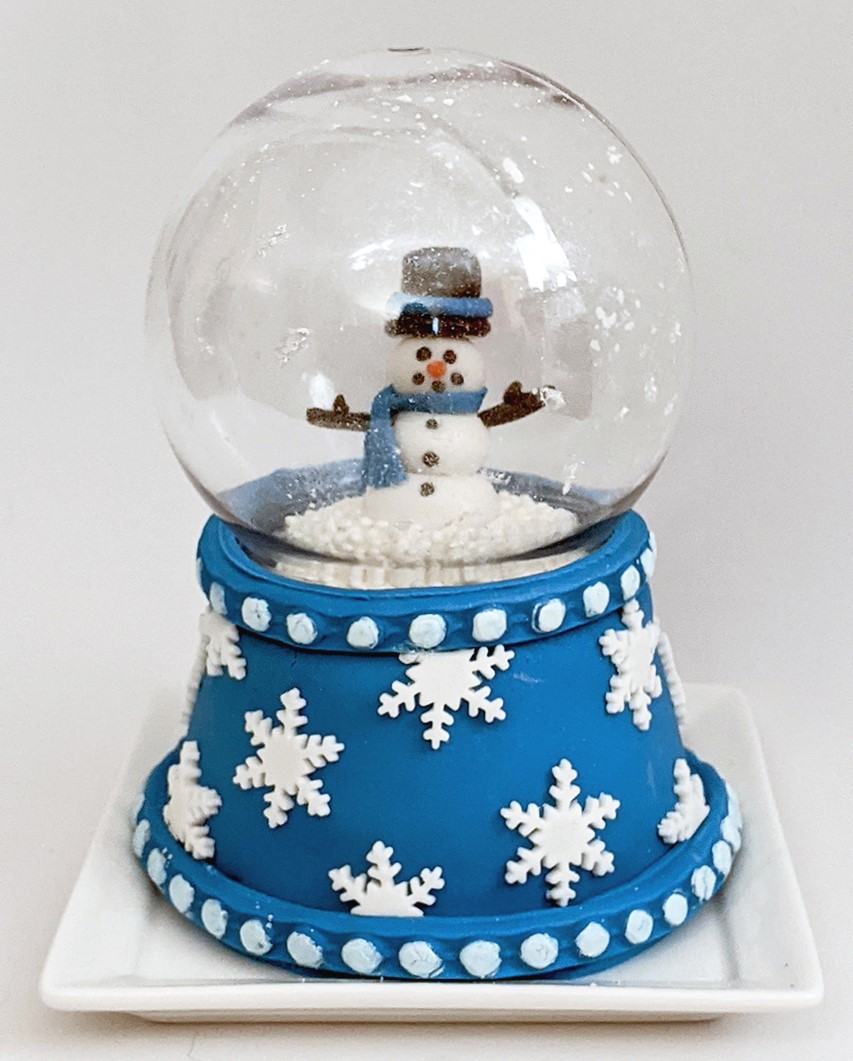
If you decide to make the edible fondant snowman, for reference, mine that’s shown stands 1½ inches tall, including his hat. However, if making the fondant snowman feels intimidating or you don’t have the time, skip using that part of the fondant and purchase small decorative items to place inside the globe. Younger kids will love the added trinket to keep.
I hope you have as much fun with this project as I did. Stay tuned for more of my Kitchen Craft series, designed to help inspire Allergic Living followers with allergy-friendly baking.
We may have to manage food allergies, but with a pinch of patience, a cup of creativity and a liter of love, we’ll create beautifully crafted desserts that everyone can enjoy. Inclusion never tasted so sweet. Photo: Ashley Smith
Ashley’s Snow Globe Cake
Makes: 1 small cake; 2 servings
Free of: Top 9 allergens and gluten-free
Ingredients
Vanilla Cake Ingredients
- 3/4 cup all-purpose gluten-free flour OR all-purpose wheat flour, sifted (see Recipe Tip)
- 1/2 cup sugar
- 1/2 tsp baking soda
- 1/4 tsp salt
- 1 tsp pure vanilla extract
- 1/2 tsp white vinegar
- 2 1/2 tbsp oil (canola, vegetable or corn)
- 1/2 cup water
Frosting
- 1/2 cup dairy-free, soy-free margarine (e.g. Earth Balance)
- 2 tsp pure vanilla extract
- 1/8 tsp salt
- 3 cups confectioners’ sugar, sifted
- 1-2 tsp dairy-free milk beverage
The Tools
- 4-inch plastic water globe ornament
- 2 round cake pans, 4-inch size
- Small serving plate or 1 circular 6-inch cake board
- Approximately 4.4 oz white fondant (such as Satin Ice Fondant)
- Blue, orange, black, brown food coloring (such as AmeriColor Soft Gel Paste)
- Cake turntable (optional)
- Parchment paper
- Whisk or fork
- Serrated knife
- Angled frosting spatula
- Exacto knife
- Fondant roller
- Vinyl gloves
- Toothpicks
- Food-safe decorating brush
- Piping bag or plastic sandwich bag
- 2.4-inch snowflake cookie cutter
- Edible pearls (such as Betty Crocker)
- Edible silver luster dust (optional; such as Top 9-free Roxy & Rich; retailers here)
- Fondant border mold (optional; find on Amazon or Etsy)
- Decorative items if not making fondant snowman (optional)
Recipe Tips
When buying gluten-free all-purpose flour, watch for allergy-friendly brands. (Some brands have allergen warnings.) Not on a GF diet? This recipe works equally well with all-purpose wheat flour.
Instructions
For Cake & Frosting
- Preparing pans: Trace an outline of the bottom of a 4-inch cake pan onto parchment paper and cut it out. Repeat for second pan. Grease the bottom and edging of the pans, then line the bottom of each with a parchment circle. Cut two strips of parchment paper for each pan, and line the edging.
- Preheat oven to 350 degrees F. Note: If using another cake recipe, cut the recipe in half to make one small cake. (You could alternatively use the remaining cake batter to make a second Snow Globe Cake or bake cupcakes from it to display alongside the cake.)
- Making my cake: Sift flour, sugar, baking soda, and salt into a large mixing bowl. Whisk or use a fork to mix dry ingredients together.
- Create 3 wells in the dry mix. Add vanilla extract, white vinegar, and oil into separate wells. Pour water over the three wells and mix with a whisk or fork. The batter should be thoroughly combined, with no lumps visible.
- Divide batter evenly, pouring approximately ½ cup into each small cake pan.
- Bake 26-30 minutes, or until a toothpick inserted in the center comes out clean. (If batter on toothpick is still wet, bake a few more minutes.)
- Let the cakes cool in pans to room temperature. Gently flip each out onto plastic wrap, and peel off the bottom parchment paper. Wrap each cake securely. Place the cakes on a flat surface in the fridge or freezer. Leave to chill 2-3 hours or overnight.
- Making frosting: In a medium bowl, use a hand mixer to beat softened margarine and vanilla for 2 minutes. It should be light and fluffy. On low speed, mix in salt and sifted confectioners’ sugar, about a cup at a time. Scrape down bowl’s sides as needed, until well combined. If frosting is too thick, stir in one tablespoon of milk beverage.
- Scoop about 4 tablespoons of white frosting into a piping or plastic sandwich bag. Set aside both this bag and the bowl of frosting. The bowl will be used to frost the cake, and the bag to decorate the globe’s snow scenery.
Shaping Globe’s Base
- Remove both chilled or frozen cakes from the refrigerator or freezer. Unwrap one cake and level the top dome carefully, using a serrated knife. (You may need to get down to eye level.) Repeat with second cake.
- Spread a tablespoon of frosting in the middle of your cake board or serving plate and then put it on your cake turntable (or countertop). Place the first cake on the cake board frosting. Using an icing spatula for even application, spread ½ inch of frosting over the top of this first layer. Take the frosting right to the edge of the cake. Now, place your second cake layer on top. I prefer to place the cake bottom side up – to create a nice, flat top surface.
- Leaving the 2-layered cake on the cake board or serving plate, place it in the refrigerator or freezer for 20-30 minutes to chill.
- Shaping: Set the chilled cake on the cake board onto your turntable or counter. Twist off the bottom of your 4-inch plastic water globe ornament and place it in the center of the cake. The bottom measured to be a 3-inch circle. Create an indent of this 3-inch circle by gently cutting an outline with a knife. (Don’t cut deep at this point.)
- Next, using that outline as a guide, angle the serrated knife outward to carefully trim the cake. Cut in a downward slope, so the cake becomes narrower at the top and wider at the base, like a truncated cone. (See the shape in the photo for reference.)
Frosting & Fondant
- Crumb-coating: With an angled spatula, apply a thin layer of frosting to the outside of the cake. (This thin layer is only to seal in crumbs; don’t use too much of your frosting.) Place cake in the freezer for about 25 minutes.
- Once chilled, set cake back onto the turntable or counter. Now cover the cake with frosting, smoothing it with your spatula.
- Working with fondant: Dust a clean counter with cornstarch or lay out a large sheet of parchment paper to prevent sticking. Put on food-safe vinyl gloves to keep your hands from staining.
- For covering the base, start removing fondant from its packaging, but leave enough white fondant to make the snowflakes and snowman in Step 8. When rolled into a ball, the white fondant being used for the base of the snow globe resembled a small snowball or pool table ball. Begin adding blue gel food coloring to this ball’s worth of white fondant and knead. Continue kneading and adding blue food coloring gel until you have reached your desired color. (I used 14 drops of blue food coloring.)
- Using the fondant roller, roll out your fondant into a curved rectangular shape, until it is approximately 1/8 of an inch thick, and 3 inches high.
- Wrap the cake with fondant. Note: If you would like to create a snow scenery similar to the cake pictured, you do not need to cover the top of the cake with fondant.
- Carefully smooth out the fondant with your hand. Trim any excess fondant that exceeds the top or bottom edge of the base with an exacto knife. Wrap and save any fondant that does not have any frosting on it for later.
- To make the snowy ground, use the frosting we set aside in the piping or plastic bag to top the cake with white frosting and top with white edible pearls. Sprinkle on silver luster dust (if using).
Fondant Snowman
- To make the snowman’s body, roll three balls out of white fondant: one large, one medium, and one small. Gently insert a toothpick into the center of the large (bottom) fondant ball until half an inch of the toothpick is sticking out. Use your thumb to carefully flatten the bottom of the snowman. Place the medium fondant ball onto the toothpick, followed by the small ball, which is the head. (See Step 4, a small piece of toothpick should go right through the head.)
- Use a toothpick to indent the small fondant ball with small holes for the snowman’s eyes, nose, and mouth. Then below, on the snowman’s body, create three vertical holes. These are where his ‘buttons’ will be inserted. Using black fondant (or white fondant colored with black food coloring gel), roll 8 very small circles and place into the eye, mouth, and button openings. Likewise, use either colored fondant or white fondant colored with orange food coloring gel to create the carrot-shaped nose. If using food coloring, wear vinyl gloves to prevent staining your hands. Tip: Remove or change into clean gloves when handling the snowman, since food coloring will easily transfer onto the white fondant.
- To create the twig arms, color a very small piece of fondant with brown food coloring. Then cut either 2 toothpicks or 2 small pieces of decorative wire to be the ‘bones’ of the arms (about 3/4 of an inch long). Wrap each with the fondant, then insert arms into the sides of the middle fondant ball.
- Make the hat by rolling out black-colored fondant into a very small disk and attaching a small cube of black colored fondant on top. Place the hat on the toothpick holding the snowman. Make sure the toothpick is long enough to hold it in place but not long enough to poke through the top of the hat. For reference: my snowman stands at 1 ½ inches tall.
- To finish your snowman, roll out some leftover blue fondant to trim the hat brim, and also to create the scarf. Wrap the scarf around the snowman’s neck area.
- Place snowman in the center of the cake. Tap luster dust above to create the effect of snow falling on the snowman.
Snow Globe Assembly & Finishing Touches
- If you want a snow globe that appears to have been shaken, put a small amount of silver luster dust onto your decorating brush. Tap the brush on the base of the plastic snow globe, so the luster dust falls into the globe and sticks to the inside. Repeat until you are satisfied with the look.
- Place the globe over the snowman.
- To make cake borders, roll out two strips of blue fondant: 11 inches and 16 inches. Press these into the fondant border mold of your choosing. (Fondant molds can be found on, Etsy, and at cake decorating stores. The one I used is here.) Attach the 11-inch trim to the top of the snow globe and the 16-inch trim to the base. Since my trim had bead accents, I mixed silver lust dust, a drop of white food coloring and a drop of water to create an edible paint. With my decorating brush, I colored each bead.
- To make snowflake decorations on the base, roll out the remaining white fondant. Press a 2.4-inch snowflake cookie cutter into it to create your flakes. Stroke the back of a fondant snowflake with a wet decorating brush. (A little drop of water goes a long way for this step.) Carefully arrange the snowflakes on the base.
If you want to create half of the snowflake peeking out the base, as the photo shows, cut out a full snowflake and use the exacto knife to trim the snowflake. Then attach to the blue fondant with a small brush of water.
That’s all for this winter-inspired Kitchen Craft. Wow your family and friends with your magical little Snow Globe Cake! Then enjoy indulging in it.
Related Reading:
Kitchen Craft: Allergy-Friendly Chocolate Chip-Pumpkin Cookies
Kitchen Craft: Top 9-Free Teal Pumpkin Chocolate Layer Cake
Pies, cookies and gingerbread: Allergic Living’s awesome list of holiday dessert recipes.
Sign up for Allergic Living's free newsletter for more great allergy-friendly and gluten-free recipes, plus the latest food allergy research and news.